PolyTiler
PolyTiler grows an Islamic geometric pattern from a tiling: every tile edge gets a contact point, lines leave each point at an angle you choose, and the lines meet inside the tiles to make stars and rosettes. Change the tiling, the angle or the motif and the whole field updates. This manual goes panel by panel, with walkthroughs for the less obvious tools.
Getting around top
The left panel has five tabs, numbered in the order you usually work: 1 Tiling 2 Pattern 3 Color 4 Effects 5 Deform. The canvas fills the rest. One bar runs across the top of the canvas: play on the left, keyframes and the parquet deformation in the middle, video and saving on the right.
| Action | How |
|---|---|
| Pan | Drag the canvas. In Build by hand and Line edits, where a click does something, hold Alt and drag. |
| Zoom | Mouse wheel or trackpad pinch. |
| Fit the pattern to the window | F |
| Play or pause the animation | Space |
| Undo | Cmd+Z (Ctrl+Z on Windows), as in Zillij |
| Redo | Shift+Cmd+Z or Cmd+Y |
| Previous or next tiling | ← → on any tab: steps through Your tilings or Polygonal systems, whichever holds the current tiling (in Muqarnas Builder, the Fields otherwise) |
| Switch tabs | 1 2 3 4 5 |
| Close the catalogue | Esc |
| Type a slider's value | Click the number beside its label, type, then Enter (Esc leaves it as it was). The value stays within the slider's range. |
Undo steps back through design changes: tilings, angles, switches, edits, motifs, built fields and hand-built tiles. Zooming, panning and the play bar are not undo steps. Most controls have a tooltip: hover for a one-line explanation.
Key ideas top
Tiling
The polygons underneath the pattern. Turn on Show tiling to see them. The pattern is drawn from the tiling, so a different tiling gives a different design even at the same angle.
Contact angle
Each tile edge has a contact point at its middle. Two lines leave that point, one leaning each way, at the contact angle measured from the edge. Small angles make long sharp stars; large angles make wide, open ones. The slider runs from 8° to 82°.
Polygonal systems and families
Jay Bonner groups historical patterns into systems by the polygons their tilings use: 4/8 (octagons), 5/10 (decagons), 6/12 (dodecagons), 7/14 (heptagons and 14-gons) and so on. An n-fold system has its own natural angles, written 2n-s k (for example 10-s3): the contact angle k × 90/n. Bonner names the common ones acute, median and obtuse. Two-point patterns put two contact points on every edge.
Module
One of the polygon shapes a system is built from: a decagon, a barrel hexagon, a thin rhombus. Every tiling in a system is made of its modules, edge to edge.
1 · Tiling top
Show tiling, Dual tiling, Split into triangles
The Tiling tab, top to bottom: Show tiling and Dual tiling; Make your own (Build by hand, System builder and Star-first, one open at a time from its row of buttons; click the open one again to fold it away); Advanced (Split into triangles and Hybrid repeat); then Your tilings and the polygonal systems.
Split into triangles (under Advanced) fans the chosen polygon type into triangles from its center before the pattern grows, so 4.8.8 with octagons split becomes squares and 45° triangles. Show tiling: Under draws the polygons' edges under the pattern; Only hides the pattern and shows the tiling by itself, each kind of tile filled in its own color (the same in every tiling, in muted glazed-tile tones: squares teal, hexagons slate blue, octagons sage, decagons amber, dodecagons jade; different kinds with the same number of sides, like Bonner's barrel and bowtie hexagons, in neighboring shades). Hover a thumbnail under Your tilings or in the catalogue to see its tiling the same way. Dual tiling swaps the tiling for its dual (one tile around every corner) and flips the angle to match; on regular tilings the pattern comes out the same, which is a good way to see why.
Stars at every vertex
Experimental. Appears for the rhombus fields (the radial sets and anything from System builder), and is off unless you turn it on. It puts a regular 2n-gon at every corner of the rhombus field, so every vertex gets a 2n-pointed star, after Bonner's Fig. 285 and Bonner and Pelletier's Part 2, Fig. 3. Bonner fills the space between his stars with further traditional shapes; here each rhombus keeps one leftover piece, so the result is busier and less traditional than his.
- Star size: how big the vertex polygons are. 1 is as big as they get before the two stars in a thin rhombus touch.
- Merge at thin corners: the stars turn half a step and grow until the pair in each thin rhombus share an edge, so they run together the way Bonner's do. Size is fixed while it is on. The field picks up a slight pinwheel twist; that is the price of keeping every line connected.
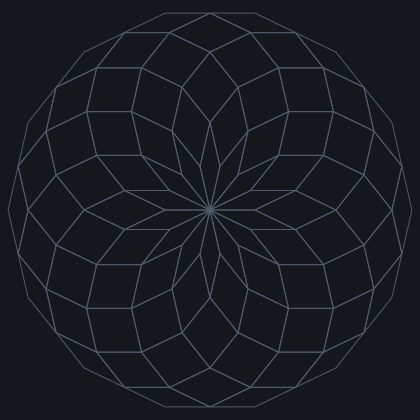
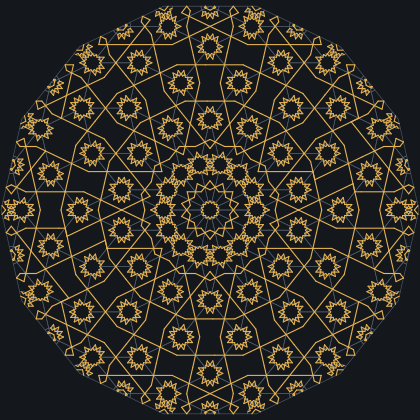
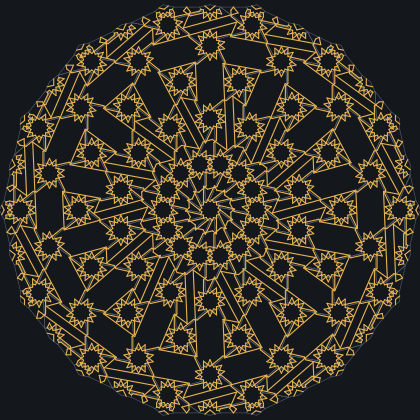
Hybrid repeat
Under Advanced, for polygonal-system sets that combine well with others. Open Find partners…, pick a partner from the same system, and press Build: the result alternates rows of the two tilings, each a whole repeat of its own, as in Bonner's Figs. 154, 162, 179 and 181. Only partners whose edges meet exactly along the shared seam are listed.
Build by hand
Under Make your own, press By hand. Lay a system's modules edge to edge yourself, the way a craftsman would on a drawing board, and watch the pattern grow on whatever you build.
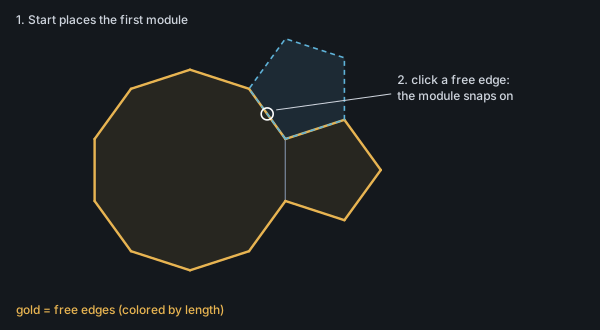
- Open the Build by hand section in the Tiling tab and choose a System (for example 5/10 · decagons).
- The row of little shapes is that system's modules. Each edge is colored by its length; edges of the same color can join.
- Click a module, then press Start. It goes down in the middle of the canvas and the pattern appears on it.
- Click another module in the row to select it, then click a free edge on the canvas (free edges are drawn thick and colored by length). The module snaps onto that edge wherever one of its own edges is the same length. The module picture uses the same colors, and the Edges key under the modules gives each color's length as a fraction of the longest, so gold goes on gold, blue on blue.
- If it can sit there more than one way (turned, or flipped), a message says how many fits there are. Click the same spot again to step through them.
- To remove tiles, switch Tool to Delete and click them (or Shift-click in either tool). Undo takes back the last placement. Alt-drag pans while you build.
- Turn on Symmetry to work like Propagate to N in Zillij: every module you add (or delete) is repeated N-fold times around the center of the first module, marked with spokes. N starts at the system's big star (10 for 5/10, 14 for 7/14). Copies that would overlap a tile are skipped. Start with the big star polygon and a few clicks give a full rosette.
- Press Done when finished. The patch stays as the current tiling, so every other tool (angle, families, motifs, colors, export) works on it.
Start from a field
Instead of one module, start from a whole field of the system's rhombi, made the way the Penrose tool makes its P3 tilings (de Bruijn's multigrid). There's one family of parallel lines per direction of the system: four for 4/8, five for 5/10, seven for 7/14. Every crossing becomes a rhombus. The rhombi are ordinary hand-built tiles, so you can delete some, add modules on the free edges, and use every other tool on the result.
- Choose a System, then press Star, Sun or Random. Star puts a big star at the center (every offset 1/2). Sun uses every offset 1/n; for 5/10 that's Penrose's sun. Random gives an asymmetric field that never repeats.
- Move the sliders and the field changes live. Phase moves every family at once. Turn off All offsets equal to set each family on its own; every setting is a different field. Radius sets the size, and Pan X and Pan Y move the window across the endless field.
- Edit it with Add and Delete. The module row now also holds the system's rhombi, so you can grow the field by hand. If you move a field slider after editing, the field is laid again and your edits are replaced; Cmd+Z brings them back.
For 5/10 and 7/14, equal offsets keep the field symmetric about the center at any phase. For 4/8 and 6/12, only Star is symmetric.
System builder
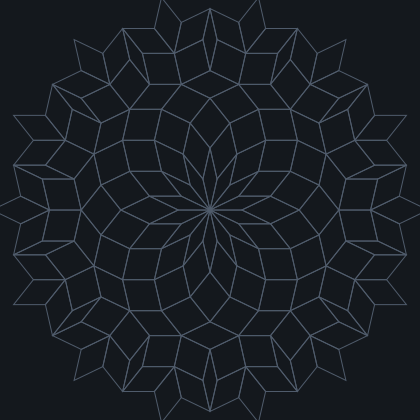
Under Make your own. Makes a whole rhombus field for any fold from 3 to 12, after Bonner and Pelletier's Part 2: a field of rhombi whose angles are all multiples of 180/n. The rhombi themselves carry the pattern, like any other tiling. Fold sets the family: fold 7 gives the sevenfold rhombi, fold 9 the ninefold.
- Set Fold. The label also shows the stars Stars at every vertex would give (Fold 8: 16-pointed).
- Choose an Arrangement:
- Rings: a big 2n-gon filled ring by ring with rhombi, with radial symmetry around a central star (Bonner Fig. 285).
- Multigrid: radial and never repeating, with a 2n-pointed star at the center (Part 2, Fig. 3).
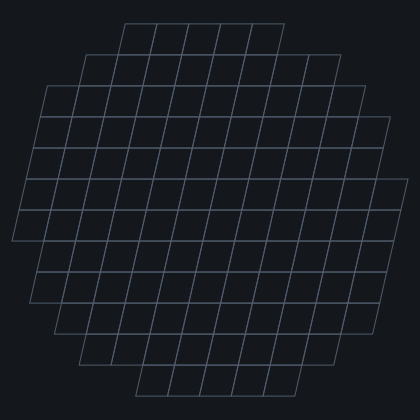
- Lattice: one rhombus repeated in rows, a periodic pattern you could tile a wall with (Fig. 283). Pick which rhombus under Rhombus angle.
- Press Build. The field becomes the current tiling.
- Go to the Pattern tab and try the family chips (14-s4 for fold 7, and so on). If you want to experiment, turn on Stars at every vertex in the Tiling tab.
Star-first (Lee)
Everywhere else in PolyTiler you pick a tiling and the stars come out of it. Star-first works the other way round, the way Tony Lee worked in his notebooks (1975 to 1985): pick the stars, pick the framework they sit on, and the tiling follows. Each star gets a regular polygon with that many sides. Polygons meet along the framework's edges, and the spaces left between them become the other tiles. The Pattern tab then draws the stars as usual.
Under Make your own, press Star-first. Every button in the panel builds straight away, and the panel only shows choices that work, so there is no Build button.
- Choose a Framework:
- Lee rhomb: an m-pointed star at two opposite corners of a rhomb, an n-pointed star at the other two. Choose a Rhomb (p × q); Lee's equation p/m + q/n = 1/2 gives the pairs of stars that fit it exactly. (3 × 2) is Lee's favorite: 30,5 18,6 14,7 12,8 10,10 9,12 8,16 7,28.
- Square (Lee's Sp1), Hexagonal and Rhombille (Lee's H1): a fixed net with two kinds of star. The chips list every pair up to 24 points that fits.
- Click a pair of Stars.
- For a Lee rhomb, the Arrangement row shows the ways that pair builds:
- Lattice: the rhomb repeated over the plane. Only some pairs tile with one rhomb: equal stars (10,10), square corners (12,8) and corners of 120 and 60 degrees (9,12 and 18,6).
- Medallion: a ring of rhombs around the second star, a panel with radial symmetry (8,16 gives a 16-star ringed by 8-stars).
- One rhomb: the rhomb and its four stars.
- Links, when both work: Along the points makes neighboring polygons share an edge (polygons in contact). Between them makes them touch corner to corner, which gives a different pattern from the same stars.
- With links along the points, the contact angle is set to Lee's Type I angle, 90 − 180/m − 180/n, where the next points of two neighboring stars line up on one straight line. Slide the angle freely after that; Type I angle puts it back.
- Turn on Show framework to see the star centers and the rhombs joining them as dashed lines.
The default motif is Rosette, so larger tiles get rosettes. For Lee's plain stars, set Motif in the Pattern tab to Star.
Your tilings and the catalogue
Your tilings is your personal collection, kept in this browser. Click a thumbnail to use it, drag to reorder, and click its heart to remove it. The row of shape icons filters the list: click a shape to show only tilings that have it, click again to hide tilings that have it, again to clear.
Browse catalogue… opens all 1,248 k-uniform tilings (k = 1 to 6). Filter by shapes, by k (how many kinds of corner the tiling has), by Regular or Irregular polygons, or show only yours; sort by size, symmetry and more. Click a heart to add a tiling to your collection. Export list and Import list move your collection to another browser; Reset to defaults goes back to the site's starting set.
Polygonal systems
Below your tilings: 84 tilings from Bonner's polygonal systems, grouped by system. Most were generated from each system's modules; the ones from a known building or figure say so in their tooltip. At the end of the 7/14 and 5/10 and 9/18 groups are the radial rhombus fields, which unlock Stars at every vertex.
2 · Pattern top
Family and contact angle
For tilings with a known system the panel shows the system and two rows of chips. Acute, Median, Obtuse and 2-point jump to Bonner's family angles; the second row lists every natural angle of the system (10-s1 to 10-s4 for 5/10). The Contact angle slider sets any angle in between.
Two-point puts two contact points on each edge instead of one, spread by Point spacing. Curve bends every line into an arc, either way. Line width and the color swatch set how lines draw on screen and in exports.
Motif and rosettes
Motif (larger tiles) chooses what fills the bigger polygons:
- Star (inference): plain star lines, straight from the contact points.
- Star, closed center: each line runs on to its second crossing, closing the star's middle.
- Rosette: the default. A true Lee rosette (petals around the star, after Lee and Soliman) on tiles with at least the number of sides set in Rosettes on tiles with. Shoulder height sets where each petal bends, from slim to full. It shows only when some tile is actually drawn as a rosette; otherwise a line says why (tiles too small, or Two-point, Dual tiling or a deformation drawing stars).
The V widget button in the middle of the top bar draws the two lines of one contact point on the canvas, in blue, with the angle beside it. Drag either ball, or anywhere along an arm, to change the angle. Click a tile edge (without dragging) to move the widget there; dragging the background still pans.
The button grays out when the widget can't be used: while the pattern plays or records, and while Parquet deformation is on (its keyframes set the angle). Hover it to see why.
Tile motifs (.zillij)
Draw anything in Zillij (a hexagram, a knot, a rosette of your own) and PolyTiler repeats it in every tile of one shape. Every shape in the current tiling has a row, irregular ones too: each 7/14 rhombus, kite or pentagon gets its own.
- In Zillij, draw your motif inside the shape it is for. The easiest start is Load template… in Zillij, which gives you the exact polygon (see Templates). Save it as a .zillij file.
- In PolyTiler, choose a tiling that has that shape, open Tile motifs, and press Load… on the shape's row.
- The drawing is centered, turned and scaled to fit the shape snugly, then placed in every tile of that shape (mirrored where a tile is the mirror image).
- Adjust Size and Rotate. Replace it drops the star in those tiles; Draw both keeps it underneath.
- A row with a motif shows a small preview of it in its tile, and the file name. Remove on the row puts the star back; Remove all motifs clears every row at once (handy after a motif set). Motifs are remembered in this browser and come out in both exports.
A whole motif set at once
Drawing one shape at a time can't check that the motifs meet each other. Instead, lay a small patch of templates out edge to edge in Zillij, one of every shape the tiling uses, and draw one pattern over all of them. Zillij's Export for PolyTiler… clips the drawing to each tile, marks any edge whose lines don't meet the next tile, and saves the set.
- Choose a tiling with those shapes and open Tile motifs.
- Press Load motif set… and pick the file. Every shape's motif goes into all its tiles at once, placed corner to corner exactly as drawn, so lines meet across every edge of the field. Size 1 is exact.
- Shapes the tiling doesn't have are kept for later, the same as with single motifs.
A drawing made on a template is placed exactly by the single-row Load… too. A drawing without a template is still fitted by eye (centred, turned and scaled to hug the shape). Muqarnas Builder reads motif sets the same way, and its Triangles and 3D tabs build from them.
Find tilings for these motifs switches to the Tiling tab with Your tilings filtered to tilings that have every regular shape you gave a motif; click a shape icon above the list to clear the filter. Irregular shapes belong to particular sets, so they don't filter.
Line edits
Bonner's subtractive and additive changes (Figs. 172 and 223). Choose Remove or Extend, then click a star line. Remove deletes it; Extend runs it on to the next line it meets. Every line in the same place in the tiling changes together, and edits hold as you change the angle. Both arms or One arm chooses one line or the pair from that contact point; Both sides or This side chooses whether the continuation across the edge changes too. Removed lines show dashed while the tool is on: click one to bring it back. Clear edits undoes them all.
Reset angle & curve
Reset angle & curve, at the bottom of the Pattern tab, puts the contact angle and the curve back to their starting values.
3 · Color top
Nested outlines draws rings inside every closed shape of the pattern, level after level, each level in its own color. Even gap offsets each ring by the same distance; Scaled shrinks a copy toward the center. Levels, Gap and Line width set how many, how far apart and how thick. Draw as Lines, Fills (solid bands) or Both. Base fill colors the band between the pattern line and the first ring. Pick a Palette, or set each level's color by hand. PolyTiler remembers the last palette (or your hand-picked colors) and starts with it next time. With Rings on in the play bar, the rings drift inward or outward (Rings drift).
4 · Effects top
Curve wave
A traveling wave of curve across the field, added to the Curve slider. Choose Linear, Radial or Spiral, its direction, wavelength and amount. Per polygon bends each tile as a unit; Smooth keeps lines smooth across edges. It rolls when Wave is on in the play bar.
Two-level design
The same pattern, scaled up by one of its system's own ratios, becomes wide outlined bands; the small pattern shows only inside them (or only between them). It gives the look of Bonner and Pelletier's self-similar designs, where a large pattern is made of a small one. Turning it on picks the right ratio for the tiling's system (1+√2 for 4/8, φ² for 5/10, and so on), and the small pattern grows wider so several of the large pattern's tiles show. Band width sets how wide the bands are; their joins are mitered.
Poincaré view
Disk projection swells the center and squeezes the pattern toward a circular rim. Compression sets how strongly. Pairs well with a center-to-edge deformation.
5 · Deform top
Bend the finished pattern without changing how it is built. Everything here works on any tiling, including ones built by hand or with the System builder, and on line edits and two-level designs. (This tab was the separate Magnifier page; old Magnifier links open here, and Recover offers Magnifier's autosaves.)
Lenses
A lens is invisible: it stretches or squeezes the pattern under it and fades to nothing at its rim, so the pattern never tears or folds. + Magnifier swells, + Shrinker pinches, + Ripple adds rings of waves, + Swirl turns the pattern most at the lens center. The first lens sits at the center; later ones come as a ring of six. Each group is a card: pick it to set its strength, size, count, distance and turn. With the Deform tab open you can drag a lens on the pattern to move its ring, or drag its rim to resize it. Lenses apply in list order.
A lens shows its Kind, Strength and size; everything else (Place, Direction, Waves, Phase, Reach, how many in a ring, distance, turn) is under More.
On tiles. Under More, set a group's Place to On tiles to put one lens on every tile of a kind (every dodecagon, every large hexagon...), each sized to its own tile. Reach limits it to tiles near the center; Keep lenses apart stops each lens halfway to its neighbor, so they sit like beads. + Tiers on the stars builds this for you: one magnifier group per kind of tile, the largest stars strongest and each smaller kind weaker.
Lenses in keyframes. Each keyframe remembers the lenses. Keys glides them from one keyframe to the next (a group missing from a keyframe fades in or out), and Parquet deformation spreads them across the pattern like the angle, with Slide moving the band along.
Pond
Drops on water. With the Deform tab open, click the pattern to drop a pebble: rings spread, fade, and pass through each other. Start from a Preset (Gentle rain, Single drops, Storm, Still water), then adjust Rain, Speed and Height; drips, symmetry, wavelength, rings per drop, fade and the rest are under More. The Pond track in Animate runs the water.
Parquet deformation
Morph the pattern across the canvas. It uses your keyframes (see Keyframes): add two or more, with Add keyframe here or + in the Animate panel, then switch on Parquet deformation and choose a Direction.
Animate top
At the left of the top bar: ▶ plays and pauses (or press Space), and Animate ▾ opens a panel with what moves, the speed and the keyframes. The button lists what is switched on. Only tracks that have something to move are shown; a line under them says how to get the others (Ripple needs a ripple lens, Pond needs the pond on, Keys needs two keyframes). Press ▶ to animate whatever is switched on: Angle sweeps the contact angle, Curve swings the curve, Wave rolls the curve wave, Rings moves the nested outlines, Ripple rolls the ripple lenses, Pond runs the water, and Tiling fades to the next tiling in your collection every 10, 20 or 40 seconds (set under Next tiling while Tiling is on). Speed runs from 0.1× to 4×. Pause holds everything where it is; switching a track off puts its value back.
Keyframes
In the Animate panel. A keyframe is a snapshot of the contact angle, the curve and the Deform tab's lenses. Set them, press +, change them, add again. Each shows as its number; hover to see its angle and curve. Click one to go back to it; the small × on it removes it; the × button removes them all. With two or more there are two ways to use them:
- Over time: switch on the Keys track and press ▶. The design flows through the keyframes and back (1, 2, 3, 2, 1...) in one smooth movement, slowing only where something turns back. While Keys plays it sets the angle and curve itself, so the Angle and Curve tracks rest.
- Across space: switch on Parquet deformation in the Deform tab. The keyframes run over the pattern, the first at one edge and the last at the other, in the direction chosen there: corner to corner, side to side, top to bottom, center to edge or edge to center. The run always spans the whole pattern as drawn, however large.
- Both: the sliding deformation. With Parquet deformation on, the Keys chip becomes Slide and switches itself on; press ▶. (Angle is greyed out then, since the keyframes set the angle.) The deformation travels across the pattern: each spot changes from one keyframe's design to the next as the band of change passes, from the first keyframe's side toward the last, and loops without a seam (past the last keyframe the run carries on back down: 1, 2, 3, 2, 1...). Pause holds it where it is; switching Slide off puts it back. It records like anything else, and Render makes it smooth at any size.
Recording a video
On the right of the top bar. The arrow next to ● Rec opens the video options: Live or Render, a size (Screen, 1080p, 1440p, 4K, Square or Instagram 4:5, 1080 by 1350, or Story 9:16, 1080 by 1920 for Instagram stories and iPhone portrait), 30 or 60 frames a second, and for Render a length. The video keeps your zoom and puts the pattern in the middle of the frame. The two ways:
- Live records what you see, in real time: press ● Rec (it starts Play if something is switched on), change things as you like, press it again to stop and save. The button shows the time. If it turns amber with a frame count, drawing can't keep up at that size and the video will play unevenly: use a smaller size, fewer outline levels, or Render.
- Render makes a video of a set length (10 seconds to 2 minutes) from the current moment, drawing every frame at exact steps, so it is perfectly smooth at any size, even 4K with outlines. It takes longer than the video lasts on a heavy design; the button shows the progress, and clicking it cancels.
Videos save as MP4 (Live saves WebM in browsers that can't record MP4). While recording at a set size the canvas shows the video's frame, letterboxed. Only the canvas is recorded, so the Tiling track's fade between tilings is a cut in a video. Render needs a current browser (Chrome, Edge, Safari 17, Firefox 130 or later).
Muqarnas Builder top
Muqarnas Builder is PolyTiler in a second mode (open muqarnatiler.html). It keeps the Tiling and Pattern tabs and adds two of its own: tab 3 turns the plan into cells and tiers, tab 4 builds the 3D vault. A muqarnas is a plan read in tiers: every shape in the plan becomes one piece, and the tiers decide how high each piece sits.
Plans
- Fields (Tiling tab): 166 finite fields with a large star at the centre, nine thumbnails to a page. The arrow keys step through them and rate them. The tilings and polygonal systems sit in a closed twirldown below.
- Sakkal family (Tiling tab, under Pole table): Mamoun Sakkal's dome-dividing method. Dome parts divides the dome into N parts, a rhombus block at the apex for each; every gap in the outline narrower than 180° then takes a block of its own angle, ring after ring, until the dome closes on an N-gon. 8 parts give the 45° family (blocks of 45°, 90° and 135°), 10 the 36° and 12 the 30°. Widest block leaves the wider blocks out, so the dome ends in a star. Ring by ring lists the gaps each ring meets; click one to cycle how it is filled: one block of its angle, a fan of the smallest blocks (this grows the dome past the polygon, as in Sakkal's domes on an octagonal base), a half block (a triangle, to straighten the rim), or none. The note under it gives Sakkal's notation for one 1/N sector, ring by ring (111 is a fan, 2B180° a half block). Examples has his 45° basic dome, his dome on octagonal base 1, and a wide 30° dome. The rhombi are the cells (Cells: Tiles is set for you).
- Pole table (Tiling tab): a plan on a polar grid, as in Persian and Ottoman vaults. Apex segments sets the star at the top, Rings how many rings of cells surround it. With More cells automatically on, a ring adds cells wherever they would grow too wide, so the cells stay much the same size; off, click a ring number to double (then triple) the cells after it. Twist turns each ring's spokes (0.5 with Alternate the twist gives rings of rhombi; alternate off winds them into a spiral), and Cell depth makes the rings shallow or deep. The star pattern over these cells stretches its stars so their points meet along the rings, as in Sinan's portals.
3 · Plan and tiers
- Everything on this tab shapes the 2D plan; tab 4 only decides how the plan rises.
- Cells: Pattern uses the star pattern's shapes as the cells; Tiles uses the tiles themselves (a pole table's tapering cells, a field's rhombi).
- Frame trims the plan to a room: Square, Hexagon or Octagon (Frame size sets how far out its corners reach). The dome then springs from the room's walls, and its tiers fold into the corners.
- Plan: Full is a dome; Half cuts it on a wall line through the apex, a portal hood; Quarter cuts it on two walls, a corner squinch. Wall angle turns the cut. A star cut by a wall still rises from its own centre on the wall line, so the apex stays at the middle of the wall.
- Centres (under A click on the pattern) places secondary stars, as the smaller muqarnas in the lobes and niches of the great Iranian hoods. Point at a star, any other shape, or a corner where five or more shapes meet: a green ring shows where a centre fits, a red one where it can't. Click to set it. The cells round it are replaced by a small star of its own, rings of cells closing on a middle cell with Centre points corners; Centre size sets how much of the plan it takes. With Symmetric on, every star (or corner) of the same kind at the same distance from the apex gets one too. Click a centre again to take it out (with Symmetric, its whole ring). A star takes the cells round its middle that make one clean hole: cells on the plan's edge and the apex are left as they are, and centres side by side share the cells between them (each takes the cells nearer its own middle), so you can place as many as the pattern has room for. A centre squeezed between neighbours gets one ring round its middle instead of two. A spot shows red if a centre there would leave a neighbour too small; the line under the sliders says why a red spot can't take one (too near the edge, cells too big for a ring, and so on). A centre that can no longer be made (after the plan changes) shows as a red cross. Each star follows the slope of the vault and rises as a small dome of its own (Centre rise on tab 4 sets how high). In Levels from Rosettes (tab 4) a centre counts as a rosette.
- Tiers: rings are counted out from the centre; click a ring (or its number) to make it a tier line. Every ring, Every 2nd and Widening (gaps that grow toward the rim) set them all at once. Rings by (under Advanced) counts rings across shared sides, or shared corners too for wider rings.
- Plan SVG in the top bar (on this tab) saves the plan in Shiro Takahashi's manner: tiers in grays, tier lines thick, cell lines thin, stars colored by their points.
- A click on the pattern: set tier lines, raise or lower single shapes (Step sets how far), trim shapes from the 3D model, or place centres.
4 · 3D
- Styles raise the plan you have in one of the ways the research describes: Kiani hood (Blocks, levels from rosettes, sunk star wells, pendants), Iranian faience, Sakkal plaster, Terraces and Line drawing. A style sets the section, the cells, the ribs, the color and the light, and clears the heights and folds set on single layers. It never changes the 2D geometry: the pattern, plan, frame, centres and tier lines stay as they are, so any style can be tried on any plan. Undo brings back what you had.
- Build (top of the tab): Folded folds every cell from its centre, the Curve bending the slopes between tiers. Blocks builds the same cells the way Hosein Kiani models a hood: an upright band where tiers meet (Slope below 1), then the cell's Curve as a few rows of flat panels up to its centre (Panel rows, 1 to 6; 1 is flat triangles straight to the centre), so a star is one point joined to every point round it. Every face is flat: a row is one flat strip where the rim is level and two flat triangles where it isn't, and neighbours share their edges exactly. The controls for Blocks only (Panel rows, Pendant foot and size, Star centres and Well depth) show while Blocks is on; every other control works as in Folded, the floating palette's layer settings too. Closed solid closes the model, and Solid picks which one: Dome (positive) is the dome itself, the space under the vault filled down to a flat base, the form as a plug or core; Dish (negative) is a block with the vault hollowed out of it, closed by a flat back above, as in a built hood (Blocks starts here, Folded on Dome). In a Dome, pendants become star-shaped holes and sunk wells become raised stars. Base depth sets how far the base or back sits past the model. Pendant hangs a column under each low point (every shape round the corner has it as its lowest corner and two or more rise from it, away from the rim; Spaced keeps two off one shape): the cells round it are notched along a star, and the star's flat sides hang Pendant below them to a flat plate. Pendant foot sets its section (4-point star, 8-point star or Octagon), turned so a point runs along a side of the cells, and Foot size its radius, as a share of the plan's typical side (up to 1.5; 1 by default). Each foot is as large as it can be up to that and stay a regular star: it is turned so its points run into the cells, it may reach most of the way along a side, and only where another pendant hangs at the side's far end does it stop short of the middle. The foot is always a whole regular star: where a cell's centre can't fan its part of the star, that corner of the cell is cut into flat triangles another way (a star point is left out only where nothing else works, a handful in every thousand). Star centres are a rosette's middle star and the top shape: Fan like every cell, Flat star, or Sunk well, the star set Well depth into the vault with upright sides, as Kiani's star ceilings. A sunk well's star folds with Fold like any cell (Fold 0 on its layer, or overall, keeps it a flat ceiling); a flat star stays flat unless its own layer is given a Fold in the floating palette. Select a rosette (click it in the model or its row in Layers) and the floating palette also has Centre point: how high the point in the middle of the rosette's centre star stands above its star points (below them when negative), in tile edges, apart from the rest of the rosette's Fold. OBJ writes each flat face as one polygon (Rhino opens them as flat faces), STL as triangles.
- Levels from (under Shape): Rings steps the tiers down from the centre of the design, by the tier lines on tab 3. Rosettes lays Hosein Kiani's method over that: every rosette is also a high point, its star at the top (set Star centres to Sunk well in Blocks for his star ceilings) and its rings stepping down outward, each cell counted from the nearest rosette, so the cells between rosettes rise toward both. Rosette rings is how many rings step down from each centre, Rosette step the height of each. The profile and tiers still shape the whole hood underneath. A centre placed with the Centres tool on tab 3 counts as a rosette too (and takes the Star centres choice), so rosettes can go anywhere. Tab 3 shows the rosettes' centres lit gold and the lines where their rings step down in teal.
- Shape: Profile sets the section: Steps (every tier the same height), Dome, Pointed (a two-centred arch, as most Persian vaults) or Stilted (a dome on upright sides). Under it, Step height (Steps) or Vault rise (the curves) sets how high the tiers climb; cells, rosettes and folds keep their size, so a tall vault can keep shallow cells. Overall height above it stretches everything at once. Centre rise (when the plan has centres) sets how high each centre's star rises, as a share of its radius. Closed solid closes it into a watertight solid for printing or casting, as the dome itself or as a dish (see Solid under Build above).
- Cells: Slope runs from 0 (flat terraces with straight walls) to 1 (every cell slopes up to the tier above, as a real muqarnas); in between, a vertical band stays under each cell, as al-Kashi describes a cell. Curve shapes every cell the same way: Flat, al-Kashi (the 15th-century Persian curve), Round (the Alhambra quarter circle) or Ogee. Fold pushes each shape's centre up or down. Pendant hangs a point from every low point, or (From stars) from the middle of every star, a star-based pendant. Cup turns each folded cell into a pocket with a flat back (its size as a share of the cell, sunk to the Fold depth) and sloped sides, as the tiled pockets of the Iranian portals; 0 folds every cell to a point. Ribs (under Advanced, with Layers and Shape kinds) add a bead along the tier lines or along every edge, like the ribs of the Alhambra vaults; Strap makes them flat bands lying in the surface, the gold strapwork of the Iranian portals (try it with color Tiles). Ribs work in Folded and Blocks; each rib is its own closed shell laid over the vault (STL and OBJ keep them as separate pieces). For casting, note that a bead hangs below the surface and can make an undercut.
- The top bar (on the 3D tab): Material Paper, By layer, Tiles (cells in cobalt, turquoise and sky blue by shape with gold ribs, as the faience of the Iranian portals) or Drawing (a line drawing, the way Shiro Takahashi draws muqarnas). Light Camera (over your shoulder) or Raking (low across the view, so pockets show their relief; Look up switches to it). Lines (with Material) draws the fold lines. View: ▶ turns the model slowly on a turntable (press it again, click the model or press a key to stop), Reset, Below (from below and to the side) and Look up (standing in front of a hood looking up, as in photographs of the Iranian portals; a full dome is seen straight up). Every slider whose range runs through zero snaps to 0 right at its middle; hold Option (Alt) while dragging to turn the snap off. Click the number beside any slider to type a value; Enter sets it, Esc leaves it as it was.
- OBJ and STL in the top bar export the model, 200 units to a tile edge, Z up.
- Save .zillij keeps the whole design to reopen here, and gives Zillij the plan as layers: Tiling, Pattern, Triangles (every cell fanned from its centre, as on tab 3, sides included) and Tier lines (the tier lines you picked).
Muqarnas Blocks (friezes, corbels, arches and domes)
A separate tool, opened directly as blocks.html (the Builder no longer links to it). It builds muqarnas the Moroccan way, from a small kit of pieces, plan first (after the "Modular muqarnas" chapter of Castéra's Arabesques). Friezes for now; corbels, arches and domes come next.
- Start from (top of the panel): four whole designs, Stalactite cornice, Pendant capital, Stalactite arch and Moroccan dome. Change anything from there. (The Iranian domes and hoods are being rebuilt on a pole-table plan, the way Shiro Takahashi's plans are drawn.)
- The plan (left; scroll to zoom, right- or Alt-drag to pan, double-click an empty spot to fit) is drawn as in the book. Squares and 45° rhombi of one edge length, some cut into triangles. The wall is the thick line at the bottom. A small circle marks each piece's feet, its lowest corners. Above the plan, the outline where the frieze meets the wall.
- Levels: every corner has one, rising from the wall to the front edge. A piece always spans one level, so pieces that touch agree: that is the book's one rule (rising ridges point the same way).
- Frieze: Grid Squares, or Turned 45° for rows of right triangles. Levels also sets the rows. Rows: squares, rhombi, or both in turn. Outline: Level, pointed Arches, Big and small arches in turn, or Rising (shoulder and step, as on the flank of an arch). For arches, set how many, their width, their rise and the columns between them. Pieces: Fewest keeps squares and rhombi whole where they can be; Triangles cuts them all.
- Corbel (Make: Corbel): a bracket standing out from the wall. Its tip sits on the wall at the lowest level; it steps a level higher per row out and per column to the sides, so its front and sides finish flush at the top. Tip: 0 is a point, more a flat face that many grid edges wide. Sides: Steep climbs a level every column, Gentle every two, for a wider, shallower corbel. Rows and Pieces work as for a frieze; corbels need the square grid.
- Arch (Make: Arch): a frieze lifted onto an arch, built of upright prisms as the real ones are: every upright face stays upright and every pendant hangs straight down. The plan runs straight across the opening, springing to springing, as seen from below; each part of it is lifted to the arch's height there. Its front edge is the face of the wall, so the opening is tallest there and steps down cell by cell to the lobed profile at the back. Shape: Round or Pointed (equilateral). The frieze's length is the opening's width (the note gives it). Every frieze setting and edit applies; Outline Arches gives a lobed opening, Level plain stepped rings.
- Ring (Make: Ring): a round dome on rings of cells, as a Persian pole table. The frieze plan is wrapped round a circle: its length is the rim, each row a ring further in, the front edge a ring round an open lantern at the top. The outline repeats round the rim (Arches gives lobes); every frieze setting, edit and pendant applies. Corners where the plan's two ends meet are edited at the left end.
- Dome (Make: Dome): a dome over a Square or Octagon room, built like the Rabat domes as a frieze running from the wall to the centre. The plan shows the part from the middle of one wall (the dashed axis) to the corner line (red); the rest is washed out. That part is mirrored and turned all round the room, 8 times for a square, 16 for an octagon, so every edit shows everywhere. Pieces crossing a corner line are cut to fit, and the piece counts include every copy. Size is the rows from the wall to the centre; Levels caps the height (below the centre's level it leaves a flat top). Outline Arches gives each wall an arch; Arch rise sets its height. The note under Dome does Castéra's counting: with rows 1 + 2 (a square row, then two rhombus rows) an octagon's corner lines meet the wall exactly; a square room closes exactly with square rows.
- Dome plan: Full, or Half (portal hood): the dome cut through two opposite walls' middles, the hood's opening left open, its cut edge a narrow rim. Look up from in front to see into it.
- Dome tops: Point climbs to an apex; Flat leaves a flat octagon (or square); Star, sunk cuts a star up into that flat top and Star, hanging hangs a star below the flat top, its foot a flat star. The star has a point on every wall's axis and every corner line: 16 over an octagon, as the book's domes, 8 over a square. Top size is how many rows from the centre the top takes.
- Stalactites hangs pendants for you, on every kind of work: Fringe along the lowest tier line inside the edge, Cascade along every tier (staggered from the tier above, as in Iranian vaults), Every 2nd on alternate tiers. Drop is how far each pendant hangs; past 1 level it hangs in front of the tier below. Pendant foot is the flat shape a pendant ends in: a regular 4-point star (its points along the plan's axes), a regular 8-point star or an octagon (Polygon), the same shape whatever cells meet at the corner; Foot size is its radius. Pendants go only where the surface slopes, never on a flat top, and only where four cells meet: never on the outline (a front edge, an end, a wall line or a cut-out), where only part of the foot could be built. In a dome, a pendant just outside the built sector is left to the next sector. Star ceilings turn the places where two or more pieces rise to one corner (their roofs would meet in a point) into a flat star: Flat level with the roofs, Sunk a star-shaped well half a level deep with a flat star ceiling, as in Iranian vaults; Ceiling star and Ceiling size set its shape and radius. Pendants take precedence at a corner. Changing these rebuilds the plan.
- Edit the plan has four tools (keys L, C, S, P). Pendants: click a corner where four cells meet to hang a pendant from it (on the outline the status line says why not), again to drop it further (up to 3 levels, then off), Shift-click to raise it. It hangs as a column with upright sides and a flat foot (see Pendant foot); the plan marks it with a filled dot (and its drop, if more than one), and the pieces round it are counted as pendant pieces. Levels: click a corner to raise it a level, Shift-click to lower it; hovering shows a green + and − where it can move and grey where the rule stops it, with the reason below the plan. Click inside a cell to change its cut. Cells: click a cell to take it out of the plan or put it back, for notches, steps and holes (the 3D walls follow). Select: drag across columns, then Copy and Paste (click a cell for the copy's left edge; the plan grows if needed), or Flip just them. Flip with nothing selected mirrors the whole plan; Make symmetric mirrors the left half onto the right. + Left, + Right and + Front add a column or a row. Anything that would make a piece span two levels is refused and nothing changes. Show ridges draws an arrow on each piece from its feet up to its back. Show levels writes each corner's level. Undo and Redo (Cmd-Z, Shift-Cmd-Z); Rebuild starts again from the settings.
- 3D (right): drag turns it freely, right over the top and underneath; Shift-drag pans, scroll zooms. Level height is one piece's height. The book's 30° slope is about 1.7. Every piece is built as a block, the way the masters' pieces are (al-Kashi, Castéra, the Andalusi templates): upright sides on its plan and a roof that rises from a band at its feet, through the cell curve, to its back edges a level up. With two back edges two vaults meet in a groin; with one back corner it rises to that corner. Where two blocks meet at different heights, the step between them is an upright face, the side triangles of the cells. Band is the upright band at every piece's foot, as a share of a level (1/7 in the Andalusi templates). Thickness: each block's flat top sits that far above the highest roof along its edges. Arches and openings stay open. A pendant is a column hanging below its tier with upright sides, ending in its flat foot. Cells sets the curve of every cell, as in the Builder. Color by piece, by level, or plaster. The grey wall behind is only for the view.
- Pieces counts each kind, named after the Moroccan pieces by their shape and feet: dembouq (a triangle with its foot at the right angle), serwaliya ("trousers": two feet), loza ("almond": one foot at a sharp corner), chiira, t'stiya (a square with two feet), ktaf and charbiyya (rhombi with one or two feet). Flat pieces at the top are the ceiling.
- SVG saves the plan and outline; OBJ (a group per kind of piece) and STL (a closed solid) save the 3D, 20 units to a grid edge, Z up. The design is kept in this browser between visits.
Saving and exporting top
Save .zillij writes a file for Zillij: the tiling on one layer, the pattern on another, nested outline rings on one layer per level, and each tile motif on its own layer, all at a scale of 42 units per tile edge. Open it in Zillij to cut, band, color and export for fabrication. The file also records the PolyTiler settings that made it.
Open and thumbnails. Every saved file carries a small picture of the view as it was (Muqarnas Builder on its 3D tab: the model). Open in the top bar shows a browser: Choose folder… shows every .zillij file in a folder, and in the folders inside it, as thumbnails, newest first; type to filter by name and click one to open it. Files without a picture (saved before, or from Zillij) get one drawn from their lines. In Chrome and Edge the folder is remembered, and Zillij shares it. Choose files… picks a file the usual way. PolyTiler reopens its saves whole (tiling, angle, motifs, colors and effects); files saved before this version bring back their tiling, angle and pattern. The same browser opens when you load a hand-built tiling or a tile motif.
Autosave. Each tab saves its design in this browser a few seconds after every change (tiling, angle, hand-built tiles, outlines, motifs), so nothing is lost to a closed tab, a reload or a crash. Every tab saves on its own, so several open designs never overwrite each other. The Recover button next to Save .zillij opens Recover autosaves: designs from closed tabs, each with a thumbnail, its time and a few earlier checkpoints. Restore brings one back (in a new tab if this one has changes of its own). It opens by itself at startup when there is something new. Autosaves older than two weeks are cleared, and they stay in this browser only: Save .zillij is still the real save.
From Muqarnas Builder to PolyTiler. To PolyTiler ↗ in Muqarnas Builder's top bar opens the design in PolyTiler in a new tab: the same tiling, angle, curve and tile motifs, for color, effects and video.
Fields (Muqarnas Builder). The Tiling tab opens on Fields: the 6 graded fields, then 160 radiating fields. Each has a large star in the middle (5 to 24 points), with 4-, 5-, 6-, 7- and 8-pointed stars around it. Numbers 107 to 166 follow Shiro Takahashi's pole-table plans: apexes of 7, 9, 15 and 21 segments, and square and octagonal plans. Nine thumbnails show at a time. ‹ and ›, or the left and right arrow keys on any tab, step through every field, so you can judge the 3D dome too. The page turns by itself. Pole table and Sakkal family below are closed twirldowns: click to open one. Your tilings and the polygonal systems are in the Tilings and polygonal systems twirldown at the bottom of the tab, closed at first.
SVG exports the pattern as vector lines (with rings, fills and motifs) for Illustrator, Rhino or a cutter.
Templates in Zillij top
Every polygon PolyTiler uses is also a ready-made Zillij file: the regular polygons from triangle to 18-gon, and every module of every polygonal system (74 shapes). In Zillij, open Load template… under Save / Load:
- Pick a shape from its system group. It is added to the canvas as a new layer, centered on the origin (0, 0).
- Each side is a separate line, so it can be cut, extended, banded or colored like anything else you draw.
- Size sets the shape's width or height, whichever is larger: 100 to 500, 200 by default.
- To build a tiling from several shapes, choose an Edge size instead (50 to 500): every shape then gets the same side length, so their sides match. Drag them edge to edge (corners snap).
The same shapes are in the templates folder next to Zillij, one .zillij file each (every shape with a 200-unit edge, so they keep their proportions, centered on the origin), with an index.json listing them.
Troubleshooting top
A feature in this manual is missing
You may be on an older copy of the app. The public site is updated by hand and can lag behind; reload with Cmd+Shift+R to skip cached files.
Stars at every vertex or Merge at thin corners doesn't show
They appear only for rhombus fields: the radial sets at the end of the 5/10, 7/14 and 9/18 groups, or anything made with System builder.
A tile motif doesn't appear
Check that the current tiling has that shape (rows for absent shapes are dimmed) and that the drawing has visible lines in Zillij (hidden layers are skipped).
Lines end loose at the edge of the field
That is the edge of the patch, where tiles stop. Zoom in, or export a window from the middle.
For Zillij itself (drawing, cutting, bands, templates) see the Zillij reference. Polygonal systems and pattern families after Jay Bonner, Islamic Geometric Patterns (2017), and Bonner and Pelletier's two-part paper on the polygonal technique (Bridges 2012).